Firstly, for those not familiar with MTA-STS OR CloudFlare Workers I will give a brief introduction to each.
MTA-STS (Mail Transfer Agent Strict Transport Security) is an email security standard designed to make it harder for an attacker to get emails sent to an alternative location and to prevent attackers downgrading email encryption on emails to clear text. It does this by using a .txt file hosted on your domain and a DNS record establishing the presence of the file.
Contrary to what it may sound like, CloudFlare Workers is not referencing CloudFlare employees! Workers is a serverless application platform running on Cloudflare’s global network. It allows you to run JavaScript on a CloudFlare edge node close to the requesting user and do some clever stuff to avoid sending requests to your origin server, or even modifying requests going to the origin. The use case here is pretty simple though!
For further reading on MTA-STS click here and for further reading on CloudFlare Workers click here.
So, why would we want to use CloudFlare Workers to host the MTA-STS .txt file? Well… hosting on CloudFlare Workers gives a number of advantages, the most obvious one being the lack of requirement to maintain a server to host the file. Other advantages include the ease of editing from the Cloudflare Workers dashboard and the speed of serving the file from a Cloudflare edge location.
So… what configuration is required? Well its actually relatively simple when you understand how CloudFlare Workers – work!
Without going too much into the specifics of CloudFlare Workers config the two main things you will need to configure are the Workers code and the routes.
First, lets look at some code.
const txt = `version: STSv1
mode: testing
mx: aspmx.l.google.com
mx: alt1.aspmx.l.google.com
mx: alt2.aspmx.l.google.com
mx: aspmx2.googlemail.com
mx: aspmx3.googlemail.com
max_age: 86400`
The first thing we do is set the contents of our MTA-STS .txt file as a const called txt. Refer to the above further reading link on MTA-STS to see syntax for the file. Note that in the file above we are in testing mode using G Suite MX servers.
async function handleRequest(request) {
  return new Response(txt, {
    headers: {
      "content-type": "text/plain",
    },
  })
}
Next up we create a function to handle the request. This function will return the txt const we set earlier along with the content-type of text/plain which tells the requester this is a text file.
addEventListener("fetch", event => {
  return event.respondWith(handleRequest(event.request))
})
Finally then all thats left to do is run the handleRequest function whenever a request is made to the Worker.
Note that as no specific parameters for a path have been defined this will return the .txt file no matter what URL the user browses to, e.g if they visit https://mta-sts.mikehosker.net/random123 they will see the same thing as if they had browsed to the correct path of https://mta-sts.mikehosker.net/.well-known/mta-sts.txt
So, that’s it for the file content… what about the routes?

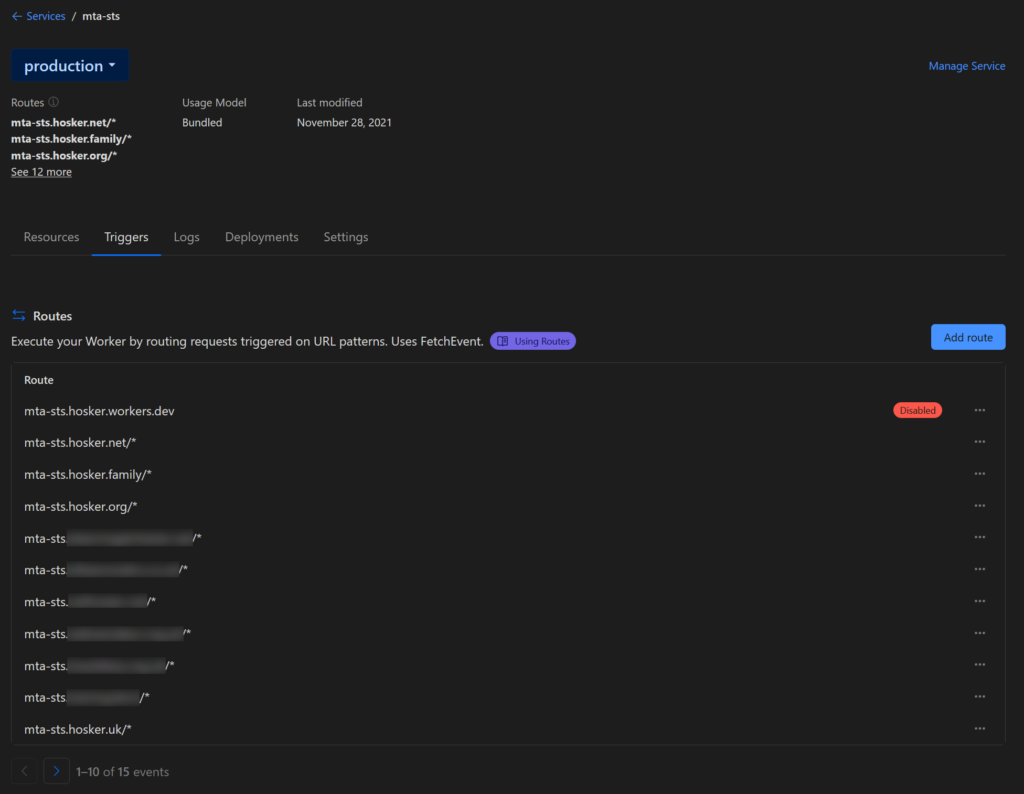
Routes are configured under the triggers tab of the worker. In here you will want to add all of the domains you wish to be covered by the mta-sts file we built above in the code.
As you can see in the above screenshot I am hosting a single mta-sts.txt config file for the majority of my domains as they all use Google G suite mail servers.
All that remains is to configure the above routes to be proxied through CloudFlare, this can be done via the normal CloudFlare DNS management pages. Official documentation recommends pointing the record to the IPv6 discard prefix 100:: then ensuring the record has the orange cloud selected to be proxied via CloudFlare.
And that’s it, you should now have a low maintenance MTA-STS config setup using CloudFlare Workers.