Having recently been migrating a number of web apps from a legacy IaaS Windows server VM setup over to Azure App Services a question arose around high availability / resiliency and specifically in the case of Azure – region resiliency.
Sometimes having a complete HA / DR into a secondary region can be too costly, complex and simply not required. So whats a good alternative that can remain cost effective and easily function with multiple sites?
Enter Azure traffic manager and an Azure app service hosting a custom problem page.
Picture this – you have lots of web apps running in North EU (or even on premise, third party etc) with no secondary region or resiliency and one or all of them fail. This could be due to a complete region disaster or something as simple as a 500 server error caused by dodgy code! Under normal circumstances users would see a not very friendly timeout error, but what if instead we could show them a nice services unavailable error page custom to each site, like this –
How do we achieve this?
The answer is two fold, firstly we need a problem page hosted in an alternate region / location to the primary app and secondly we need to create an Azure traffic manager with priority based DNS load balancing to display our problem page if the primary endpoint fails.
So, lets start by looking at the problem page.
In my case the webapps I had been migrating were all located in North EU, so I created my problem page app service in West EU using the current latest PHP 8.1 which builds NGINX Linux based containers.
Next, I copy my custom problem page PHP code into an index.php file outside the wwwroot
directory (it will become clear why its outside the root shortly), I suggest creating a new directory alongside wwwroot
under /home/site/
e.g /home/site/problem/index.php
.
You can edit the $sites
array to include your sites domains and the parameters for each site – name, image and text. Note that when adding sites you should put the most specific sites at the start of the array, e.g blog.example.com before example.com.
<?php
/*
Name: Multi Site Problem Page
Description: Simple single app problem page that can be used with multiple domains.
Author: Mike Hosker
Author URI: https://mikehosker.net
*/
/*--------------------------------------------------------------
# Custom Sites
--------------------------------------------------------------*/
$sites = array(
// Site domain e.g example.com
// NOTE: Be sure to put the most specific on top e.g blog.example.com before example.com
"devoorwaarts.com" => array(
"name" => "DeVoorwaarts", // Name to be displayed e.g Example Company
"img" => "vw.jpg", // Image file name - lives under /img/ in the wwwroot dir e.g example.jpg
"text" => 'Secure portal login can be accessed via <a href="https://portal.devoorwaarts.com">portal.devoorwaarts.com</a> / Veilig inloggen op de portal is toegankelijk via <a href="https://portal.devoorwaarts.com">portal.devoorwaarts.com</a>', // Additional text - for example a company specific message
),
"blog.topqore.com" => array(
"name" => "TopQore Blog",
"img" => "tq.png",
"text" => 'The TopQore blog is currently unavailable for scheduled maintenance.',
),
"topqore.com" => array(
"name" => "TopQore",
"img" => "tq.png",
"text" => '',
),
);
/*--------------------------------------------------------------
# Defaults
--------------------------------------------------------------*/
$defaults = array(
"name" => "Mike Hosker", // Name to be displayed e.g Example Company
"img" => "mikehosker.png", // Image file name - lives under /img/ in the wwwroot dir e.g example.jpg
"text" => '', // Additional text - for example a company specific message
);
/*##############################################################
- Code
##############################################################*/
# Set the required variables for the requested domain
# Loop through each custom site
foreach($sites as $site => $sitevalues){
# Check if user domain is the current custom site
if(strpos($site, $_SERVER['HTTP_HOST']) !== false){
# If it is then we set the variables for that custom domain
$name=$sitevalues['name'];
$img=$sitevalues['img'];
$text=$sitevalues['text'];
# And break as we dont need to check the rest of the custom sites
break;
}
}
# Set defaults if not set via custom sites above
if (!isset($name)){$name=$defaults['name'];};
if (!isset($img)){$img=$defaults['img'];};
if (!isset($text)){$text=$defaults['text'];};
# Display the HTML with the required variables
echo '
<!DOCTYPE html>
<html lang="en">
<head>
<title>'.$name.' - Services Unavailable</title>
<meta charset="utf-8">
<meta name="viewport" content="width=device-width, initial-scale=1, shrink-to-fit=no">
</head>
<body>
<div style="font-family:Verdana">
<center><img src="/img/'.$img.'" alt="'.$name.'" width="600"></center>
<center><h1>'.$name.' - Services Unavailable</h1></center>
<center><p>Services are currently unavailable.</p></center>
<center><p>We apologise for any inconvenience this may cause.</p></center>
<br>
<center><p>'.$text.'</p></center>
</div>
</body>
</html>
';
?>
We now need to create an img
directory under wwwroot
and populate it with the images referenced in your $sites array, being sure to check the names and file extensions match.
With the above in place we can now create the final index.php
under the wwwroot
directory and give it the following contents based off the path to your initial index.php
file:
<?php
include '../problem/index.php';
?>
The reason I prefer to do it this way vs just putting all the code into a single index.php
under wwwroot
is because if PHP fails and stops running on the server, visiting users will be presented the raw .php
files to download! So if all the code was in the root directory that site visitors are accessing and something were to go wrong on the server, anyone has the ability to download all the source code. Less of an issue in this case as its not got any particularly sensitive information within, however if you had SQL connection strings with passwords or similar it could be a big problem!
Another important configuration in the app service is configuring NGINX rewrites to send any path to index.php
and therefore make any request no matter what the path return a HTTP 200 OK. This is extremely important when using traffic manager with a custom probe that probes a specific path e.g /probe.php
which under normal circumstances would fail with a 404 not found on the problem page app service and therefore make it show within traffic manager in a degraded state. This would mean that should a failure occur all traffic manager endpoints would show as degraded and requests would default to endpoint with the priority 1 – not the problem page!
I have covered setting a custom NGINX config in this post so wont repeat the steps to do that here, however below is a simplified NGINX config required to replace the WordPress specific config referenced in that post:
# ***************************************
# Problem Azure AppService NGINX Config
# ***************************************
# Mike Hosker - mikehosker.net
upstream php {
server unix:/tmp/php-cgi.socket;
server 127.0.0.1:9000;
}
server {
#proxy_cache cache;
#proxy_cache_valid 200 1s;
listen 8080;
listen [::]:8080;
root /home/site/wwwroot;
index index.php index.html index.htm;
server_name example.com www.example.com;
port_in_redirect off;
# redirect server error pages to the static page /50x.html
#
error_page 500 502 503 504 /50x.html;
location = /50x.html {
root /html/;
}
# Disable .git directory
location ~ /\.git {
deny all;
access_log off;
log_not_found off;
}
# Add locations of phpmyadmin here.
location ~ index\.php$ {
fastcgi_split_path_info ^(.+?\.php)(|/.*)$;
fastcgi_pass 127.0.0.1:9000;
include fastcgi_params;
fastcgi_param HTTP_PROXY "";
fastcgi_param SCRIPT_FILENAME $document_root$fastcgi_script_name;
fastcgi_param PATH_INFO $fastcgi_path_info;
fastcgi_param QUERY_STRING $query_string;
fastcgi_intercept_errors on;
fastcgi_connect_timeout 300;
fastcgi_send_timeout 3600;
fastcgi_read_timeout 3600;
fastcgi_buffer_size 128k;
fastcgi_buffers 4 256k;
fastcgi_busy_buffers_size 256k;
fastcgi_temp_file_write_size 256k;
}
location / {
# This is cool because no php is touched for static content.
# include the "?$args" part so non-default permalinks doesn't break when using query string
try_files $uri $uri/ /index.php?$args;
}
}
Finally for the app service you will need to add all your custom domains and any required SSL bindings for them.
With that complete and the app service fully configured we can move on to creating the traffic manager (don’t worry, this is a lot quicker!)
Traffic manager is actually a very simple product, a DNS based load balancer. In our implementation for problem pages it is actually even more simple using a priority based profile.
Effectively your domains point at traffic manager via DNS, TM probes your endpoints e.g web server and problem page to check they are up. If an endpoint encounters an error e.g goes offline then it will be put into a degraded state and taken out of service. At that point depending on your config different things can happen but with a priority based TM profile it will move on to the next available endpoint which should be your problem page and hence that would be what visitors see when they then visit your site.
So to get started you first will want to create a traffic manager resource, selecting the routing method as priority. Whatever you enter as a name will be created as a subdomain of .trafficmanager.net
and you will point your domains DNS at that using a CNAME. So if you called your traffic manager MH-Prod-Global-Websites-WordPress-Traf then your subdomain would be mh-prod-global-websites-wordpress-traf.trafficmanager.net
and you would create a CNAME record pointing to that subdomain for the domains you wish to use with that TM profile.
Next, add in your endpoints. In a simple config this will be the public IP address of your web server as priority 1 and the public IP of your problem page as priority 2. If your web server and problem page app service both exist within the same Azure subscription as the traffic manager, then you should be able to select them both as type “Azure endpoint”. However, IMPORTANT NOTE: You cannot mix “Azure endpoints” and “External endpoints”, therefore unless you can be 100 percent sure that you will never use non Azure resources I recommend adding all your endpoints (including Azure) as external endpoints to give greater flexibility.
If you do choose to use external endpoints, a further configuration step is required in order to allow the endpoint monitoring to work correctly, that is adding a valid host to the endpoint “Custom Header settings”. We need to do this as the app service will only respond to requests on its configured custom domains not when accessing via public IP only.
You can choose to use one of the custom domains you assigned to the app service earlier or, I prefer using the automatically assigned .azurewebsites.net
domain as this should always be accessible and using a valid SSL certificate. For example if your app service was called MH-Prod-WestEU-Problem then you would set your traffic manager endpoints “Custom Header settings” to host:mh-prod-westeu-problem.azurewebsites.net
. It should then change monitor status to online.
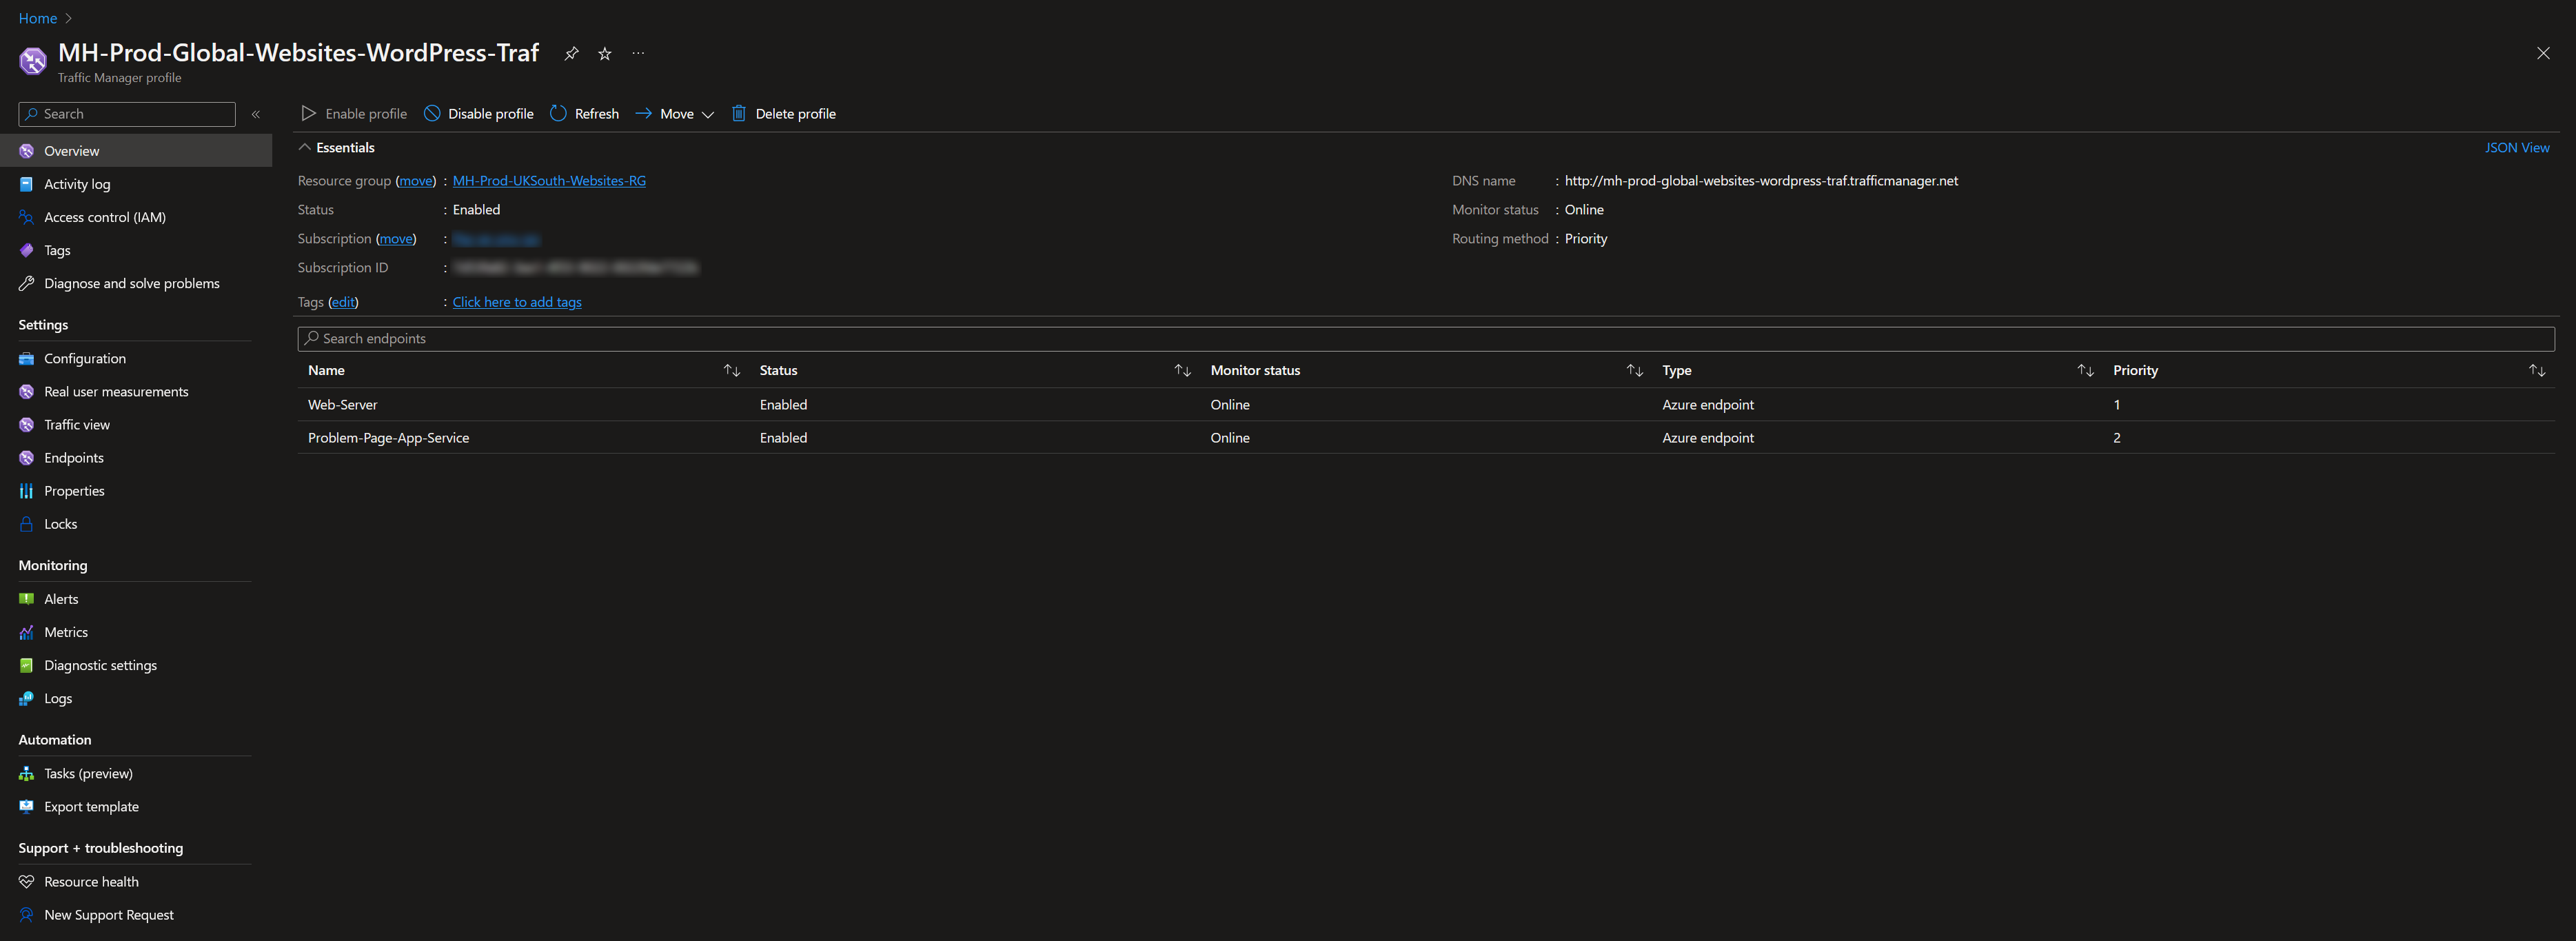
Your traffic manager profile should then look something like this:
With that all configured and your domains pointing at the traffic manager you should now have your problem page setup and working.
It can be tested by either disabling your web server endpoint which should then send traffic to the problem page, however will incur disruption to your site OR my preferred method to test the domain mapping is setting a local hosts
file entry to the problem page app service public IP address from your custom domain.
And with a reasonable knowledge of HTML, you can edit the index.php
to customize the page further:
Hopefully you don’t see the problem page too much 🙂